Friday, June 22, 2012

Why not publish on Kindle?

Can an old dog learn new tricks?

Well, I have blogged enough on the eBook revolution (see WORLD OF THE WRITTEN WORD), and marveled at the success of so many so-called "Indie" writers ... so, I thought, why not try it myself, just to see how it works?

It is a new technology, and cutting-edge stuff is fascinating -- fascinatingly rewarding, if you can teach yourself how to work it.

So I decided to publish a book on Kindle.

But I did make two rules for myself:

One, that it should cost absolutely nothing

Two, that I would share the expertise I learned with the world, via blogging and Facebook and all that good stuff.

The first thing I found is that to publish your novel on Kindle, you need to create three things:

A book

A cover

A blurb

So, let's start with the book

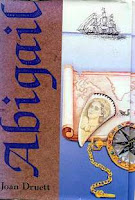
This is your novel. In my case, it was a printed book -- my novel Abigail, which was published in London, New York, and New Zealand in the late 1980s, and went into paperback and German language editions. Rights had reverted long ago, which made it legal.

However, it had been written on a typewriter, so I had no PDF file -- meaning that I had the choice of scanning it, or re-keying the entire book.

I chose to re-type the book -- all 150,000 words of it. This was partly to rewrite some parts of it: the story is set in the age of whaling under sail, and whaling as a topic has become more difficult in the intervening years.

(There really are people who think they are doing their bit to save the long-dead whales by refusing to read anything about the business, which is rather unfair to the grit and courage of the men who made a dangerous living out of the brutal trade, and the captains' wives and daughters who sailed with them. So I wanted to down-play some of the descriptive sections.)

And, while the book had been professionally edited, it had been done on manuscript, which inevitably means a less than perfect job. While there were very, very few typos to fix, there were a lot of redundancies: words that are repeated until it becomes jarring.

For instance, in just one paragraph I found five instances of the word "grip." In other places, the dialogue was stilted, and events didn't happen in an ideal order. So, re-keying the book involved a lot of self-editing and some re-writing.

It also led to many hours of proof-reading. The spellcheck is a great resource, and should be used over and over. However, it is not perfect. You have to proof-read as well. If you have a good friend with eagle eyesight and an accommodating nature, get that friend to proof-read it, too.

Now, for the preliminary formatting. My document was written in Microsoft Word, so these hints and tips apply to that.

First, I learned that to get a professional looking eBook, I needed to adapt my manuscript, because what I saw on my screen was not what is going to be shown on Kindle. Back when I learned to touch type, I was taught to hit the space bar twice at the end of every sentence; now I do it automatically. But it doesn't look good on Kindle. So this was the first thing to be fixed.

Hit the show/hide button on your toolbar, marked in orange in this screenshot:


This will bring up all the formatting. If you see a double-dot at the end of a sentence, you have hit the space bar twice. Backspace to get rid of one of them. You can take a short cut by going to find/replace and hitting the space bar twice in the "find" space (you won't see anything, but your computer will understand), and then hitting the space bar once in the "replace" space. Clicking "replace all" will theoretically get rid of all the extra spaces, but it also tends to get rid of spaces you do want, as well.

We oldies were also taught to indent the beginning of paragraphs by hitting tab. This does not work with Kindle, which does not recognize tabs.

Yet it is important to have an indent, if you want a professional looking book. So, instead of indenting the start of paragraphs by hitting the tab, you adapt the "normal" style sheet. This is to the right of the show/hide symbol in the screen shot above.

Right-click on "normal" and in the drop-down menu, look for "modify."


Hit this, and a screen will come up. Check that the font is Times New Roman, that your font size is 12. Then hit "format" in the bottom lefthand corner, and select "paragraph" from the drop-down menu.


In the screen that comes up, make sure the alignment is left, and that there are zeros in the indentation spaces. Then look for "special" on the righthand side. Select "first line" and then change the figures under "By" until it reads 0.5 cm. (Some people like a smaller indent, but I found that 0.5 cm was fine.)


Then hit OK, and OK again in the previous screen, which will then come up.

And that's it. New paragraphs will indent automatically, with no manual formatting to confuse Kindle.

In the next post I will tell you what I found out about formatting chapter headings, and the front matter of your book.  Hit THIS LINK to get there.

Formatting for Kindle

Well, here is what I have (hopefully) established in post #1:

To publish on Kindle you need: a book, a cover, and a blurb. And all of these can be created at no cost at all.

Right now, we are looking at the book -- the manuscript, which might be original, or might be a revision of a published novel. Whatever the origin of the word document, it has to be cleaned up of manual formatting.

I mentioned getting rid of tabs, but didn't describe the easy way of doing it on word. This tip comes from writer Rachel Abbott, who wrote two very useful posts, introducing formatting for eBooks, on her blog.

So, to get rid of tabs throughout your manuscript, go to find/replace. In the "find" line, type ^t (You will find ^ above the number 6). In the "replace" line make sure there is absolutely nothing. Then hit "replace all." Lo, your tabs have all gone.

She also gives a method for getting rid of unnecessary spaces, for people who habitually hit the return key at the end of every sentence. It's complicated: the best advice is avoid doing it. The return key should only be hit at the end of a paragraph.

Indentation. This should be done automatically, via the paragraph formatting screen in your "normal" style sheet. Let's look at that screen again: right-click the "normal" style sheet, go to "modify" and click "paragraph" to bring it up.


The alignment should be left. DON'T JUSTIFY. There is a big temptation to do this, because on eReaders, as in print books, the right margin is justified. On Kindle, however, the reader is in charge of font size, and every time the font size is changed the righthand margin changes, too. So Kindle won't be able to cope if you justify your document.

First line should be by 0.5 cm -- or 0.4 cm if you prefer. Not more than 0.5 cm, though.

Spacing should have zero in both boxes. Nothing before, and nothing after. This is contrary to the advice given by the Kindle builder (which you can download for free as a Kindle book from Amazon). The builder tells you to put something like 10 pts. in one of the boxes. Don't do it. I followed instructions, and had to fix it fast. Believe me, it looked awful. So, I repeat, have 0 in both the before and after boxes. Also, the spacing should be single. Kindle automatically puts a good space between lines, for easy reading, so you don't have to worry about it.

Hit OK and close that screen, hit OK again, and go back to your manuscript.

Now, get rid of all manual page breaks. I did this by running quickly through the document and deleting them. This will make your document look messy, with all the chapters running together, but another style sheet will fix that.

Chapter headings

Go back to your style sheet ribbon. Choose "Heading 1" and right-click to get the drop-down menu. Hit "modify"


Keep the font as Times New Roman, but change the font size to 16.

Then go to "format" in the bottom lefthand corner, bring up the menu, and hit "paragraph."


Change the alignment to "centered."

Change the special to "none"

Spacing -- put 42 pt in the "before" line and 18pt in the "after" line. But keep the line spacing single.

Now, go to the top and hit "line and page breaks," bringing up this screen:


In the screen that comes up, click the box by the fourth option "page break before."

(You don't have to click the widow and orphan box or the keep with next boxes; I prefer to do it as it saves having the last line of a paragraph leaking onto the next page.)

Hit OK and then OK on the modify screen to close it.

This makes "heading 1" your style sheet for your chapter headings. Now, go to each chapter head -- easy to do if you have prefaced each one with the word "chapter" by using your "find" facility; if not, you will just have to hunt. Highlight your chapter head -- even if it is just your chapter number -- and click "heading 1" in your style sheet ribbon. And lo, you will find that chapter heading set off from the rest.

Now then, if you write as I do, there are sub-sections within your chapters, which you might have separated with a double hit of the return key, to make a line space. This can be done very neatly by using symbols such as ### or ()()() or <><><>; I used the last one, by hitting return three times, and inserting <><><> after the second return. Then I formatted it with yet another style sheet -- the "subtitle" one this time.

Again, go to "modify" and then hit "paragraph."


Make alignment "centered"
Make special "(none)"
Put 3 pt in the "After" box at "spacing."

Hit OK and the OK again to close the style sheet. Now, go to all those triple returns (easily found with the find facility, if you have used a symbol), highlight all three and click "subtitle."

Quotes

I had an extra problem, because I quoted from a lot of sea chanties in the book, and I wanted these quotes to be set off from the rest of the book. So I adapted the "quote" style sheet:

Right-click that style sheet in your ribbon, bringing up the "modify" screen. Click "format" in the lower lefthand corner, and click "paragraph" in the menu.


This time, you are allowed to justify. I don't know that it is necessary, but it seems to help set it off on Kindle. The important thing is to adjust the indentation: after some experimentation I found that 1.5 cm was best. Make sure that the special is "(none)"

Click OK and OK to close the screen, and go to all those quotes. Highlight them, click the "quote" style sheet, and lo, the chantey is indented the way your want it. I also set the quotes off with a double hit of the enter key both before and after.

If your quotes are not poetry, but are items from letters or newspapers, you can fix this by putting 6 in the before and after boxes -- not only will this set off your quote from the rest of the manuscript, but it will put spaces between the paragraphs within your quote.

Front matter

Insert two blank pages at the front of your document. The first will be your title page, and the second your copyright claim.

Title page

And guess what, you do it with yet another style sheet -- the one called "Title."

At this stage, I decided to change the title of my book. I had always hated the title "Abigail" as I thought it limited my audience, but all the publishers (save the Germans, who called the book Abigail's Legacy) insisted on using the name of the major female character. I wanted to call it "A Love of Adventure," as not only is it the first line of the chantey that is quoted the most, but whaling was one of the ultimate adventures, particularly for a young woman. And the book was revised, so I thought, Why not? As long as I made it plain that the title had been changed, to make it fair to people who might have already read it ...

Right-click it in your style sheet ribbon, and click on "modify"


Don't play around with your font face -- believe me, it doesn't work, as Kindle won't take a blind bit of notice. Keep it Times New Roman, but click on "bold" and change the font size to 28.

Now go to "format" and click on "paragraph"


Make your alignment "centered" then make sure that special is "(none)". Go to spacing and put 42 pt in the "before" box.

Hit OK and OK, and bring up the first of the two blank pages you have created at the start of your document. Type the title of your book, and then the author's name underneath (Kindle is strict about this). Highlight both, and click the "title" style sheet box.

Credit

This is the page that gives legal credit to the people behind the book. This is what I wrote:

A LOVE OF ADVENTURE text © 2012 Joan Druett

Cover Photograph © 2012 Ron Druett
All Rights Reserved


Adapt it for your own book, and then create a style sheet for it by going up to "Heading 2" in your stylesheet ribbon. Right-click for "modify." Bring up "paragraph" in the format menu


Alignment centered, special none, and 6 pt both before and after.

Click OK and OK. Highlight your credit, and click on heading 2.

That's your document. Next time, we will look at making a jacket.  Hit THIS LINK to get there.


Creating a Cover ... at no cost at all

Your document is ready ... almost

But how about a last check?

You might want to bring up show/hide to check that you have removed all manual formatting except for the "new paragraph" sign that shows where you have hit enter. Otherwise there will be dots to show spacing between words, which should be single.

And clever you, you have used style-sheets to format the title page, chapter headings, section breaks, and quotes. It's a very good idea to check that these all worked properly ... and do another stint of proof-reading, just in case your style-sheets have removed a few necessary letters, quotation marks, or spaces.

There are a couple of additional wrinkles that might or might not interest you.

In traditional print publishing, as you may have noticed, the first line of every chapter is not indented. Whether you want to follow this style or not is up to you; personally, I don't think it makes a tad of difference. However, if you do want to try it, just click the first letter of the first word of the first sentence of the chapter, and go up to "paragraph." Then go to "Special" and change the box to "none."


Hit OK, and presto, your first line won't be indented any more, but the rest will be indented the way you want it.

Do this for every chapter.

Secondly, when a sentence trails off with three dots ... or ends abruptly with -- on Kindle the dots or the long dash can leak over to the next line, which looks odd. If you wish to be particular, go through your document and close up the gap between the last letter of the word and the dots... or the dash-- This fixes the problem.

And that's it. In the meantime, close your document, keeping it in .doc or .docx We will adapt it for publishing later.

<><><>

Now for the COVER
I found a really nifty website with a revolutionary and miraculous method for creating a jacket with powerpoint, created by William King and called "Creating your own eBook cover, step by step, with pictures." So I recommend you read it, as my method is much the same, with a few extra tips (and different pictures). The method, apart from being incredibly easy, also has the huge advantage that throughout the process of creating your cover you can see a thumbnail to the left. On Amazon, only thumbnails are shown, remember, so you have a very good idea of what the finished product it like.

So let's do it.

Open powerpoint.

Hit the "home" tab, and then hit "new slide" and in the layout (immediately to the right) choose "blank."

Now you must change the page setup.

Go to the tab in the ribbon that says "design" and hit it.

Now, at the far left of the new ribbon, you will see "page setup."

Hit it, and you will get this screen:


First of all, click "portrait" beside both letters A.

On the lefthand side, choose "custom" for slide use. The width and height are more complicated. As King says, the ratio should be 3:4 My powerpoint is set up for metric, so I have a height of about 20 and a width of about 15. If you have inches on your screen, follow King's advice, and have a height of 8 inches and a width of 6.

Now, you insert the image you have very carefully chosen for your cover. In my case, I sorted through Ron's huge collection of maritime photographs, ending up with exactly what I wanted, the tiny silhouette of a ship sailing into a hugely dramatic sunset.


And remember, INSERT it. Don't paste: it won't work. Hit the "insert" tab in the top ribbon of powerpoint, then click "picture" (NOT "photo album), and browse for the image that you have saved in your pictures library.

Now you add the author's name and the title of the book, with the insert tab again.

Go up to the top ribbon, hit insert, and then hit "text box." Then click on the slide in the place where you want the words to start. The shape of a box will form. Type in the words. I chose to put the author's name at the top, and the title near the bottom, because there was good contrast with the dark sea.

Then you play with fonts and effects. I chose Baskerville Oldface for the author's name, and the more romantic Brush Script MT for the title. Adjust the size so that it looks bold, keeping your eye on the thumbnail to check readability. I chose 60 pts for the author's name, and 54 for the title.


I chose to keep the lettering plain white for good contrast, but you can have fun with effects, such as beveling, or putting a glow around the words. Highlight your words, and "format" will come up in the ribbon. Hit this, and find "text effects."


Hit this, and a drop down menu with all sorts of choices will arrive. Experiment as much as you like, but keep an eye on that thumbnail in the lefthand screen, to make sure that you are not blurring the words beyond recognition.

Save your cover, making sure you save it as jpeg (not as powerpoint).

Go to the button at the top lefthand corner of your powerpoint page, and click "save as." In the screen that comes up select the place where you want to save it in your pictures library, put YourBookCover in the "file name" box and then run down the options in the "save as type" box until you come to "Jpeg file interchange format."


Click to save. When a box comes up saying "Do you want to export every slide or only the current slide," click "current slide only."


Keep on going back to it -- to the powerpoint slide, NOT the picture in your jpeg file, as the jpeg will degrade every time you do something to it. Tinker, tinker, and revise, until you are absolutely happy with it. Save it anew each time, either overwriting the original jpeg or giving it a different title. Then, when you are absolutely sure this is the cover for you, bring it up in Microsoft Picture Manager. Click "edit pictures" in the top ribbon. When the menu arrives, click "resize."

Kindle have new rules: the longest side of your cover must be at least 1000 pixels. So you have to adjust the figures to match. I coped by making the smaller ratio -- the width -- 1000, and the program specified the height to suit.


So it was 1327 x 1000, which was a little larger than the usual Amazon thumbnail but seemed to work very well.

Save, and your cover is ready.

Next step, the blurb. Hit THIS LINK to get there.
<><><><><>


Inter alia. I adapted King's method for making the screen shots used throughout these little tutorials. I went into document, brought up the screens I was talking about, then hit ALT + "Print Screen" -- which is a key at the top right of my keyboard, but might be somewhere else on yours.

Then I opened powerpoint, created a blank slide, and pasted the screenshot onto the slide by hitting CTRL + v Hitting "format" in the top ribbon of the powerpoint screen allowed me to crop and resize the image as necessary. Then, by right-clicking on the image, I brought up a menu, hit "save picture" and saved it as a jpeg in my picture file.

Thus it was ready to use in my blog.


Writing your blurb

You now have the book, and the cover

The final item you have to get ready before publishing on Kindle is the blurb

This is the quickest and simplest task, but it is just as important as the first two -- maybe more so, because this is the advertisement for your book, the enticing description that will prompt someone to buy it.

Think of it as the inside flap of a printed book. In the same way, it should tell just enough of the story to make reading the novel enticing, with an indication of what kind of book it is -- a maritime historical adventure, in my case.

You will insert this into a special box in the publication process. It must not be attached to the novel itself. Therefore, open a new word document, and save it as YourBookBlurb Then start writing, very carefully and thoughtfully, and be prepared to rewrite several times. And proof it until you are absolutely sure that there are no typos. Unfortunately, html tags don't work, so you won't be able to italicize anything. However, you will be able to post it in Times New Roman font size 12, just like your novel.

Kindle is generous with length, allowing you 4,000 characters, which is about 750 words. However, if you look at book descriptions on the Amazon book site, you will find that after about 200 words the description fades, and the reader needs to hit "read more." So, you must put the major message into those first 150-200 words.

Accordingly, this is what I put into the first three paragraphs, or 185 words:


Born at sea and raised on shipboard, adventurous young Abigail Sherman wants nothing more than to be wedded to the ocean. Like her mother, a pioneer seafaring woman, Abigail is convinced that her destiny is to be a captain’s wife at sea.

Instead, fate conspires against her, when her father packs her off to the dour household of relatives in New Bedford, Massachusetts, to learn proper womanly decorum. Arriving on the same day as the momentous news of the discovery of gold in California, Abigail does her best to conform, despite being involved in controversial events, including the Women’s Rights movement, and a sensational murder trial.

News of her father’s brutal murder impels her to escape to South America, where she enters into a marriage of convenience with a strongwilled young whaling captain. Her legacy is the ownership of the brig she grew up on, and a puzzling rhyme that may lead to a fortune. But, before she can return to New Zealand to collect, Abigail must outwit the grumbling seamen of her husband’s ship, a mystery murderer, and her own attractive, strangely hostile husband.

This covered the area before the text fades into "read more." After that, I concentrated on the history of the book and something to promote it, rather than its core story.


When originally published as Abigail, this colorful seafaring saga attracted many enthusiastic reviews. “Lots of adventure, a colorful cast of characters, and enough whaling details to provide a first-rate vicarious experience,” wrote Joan Hinkemeyer for Library Journal, while Publishers Weekly applauded, “Excellent characters in full sail amid tangy salt air and creaky timbers offer prime entertainment ... engagingly captures the atmosphere of whalers and their world.”

Updated to reflect Joan Druett’s continuing love affair with the sea and the courageous women who voyaged under sail, A Love of Adventure steers the reader through Abigail’s incident-ridden voyage to a nail-biting conclusion, with many exotic landfalls on the way.

And that was it. I thought it was plenty.

While you are writing, you can keep track of your character count by hitting "review" in the ribbon at the top of your word page.


This brings up a ribbon where the fifth option from the left ends with the tab "Word Count." Hit this, and a little screen will come up.


You probably won't need this, the character count allowance being so generous, but it is nice to be sure that you won't be stalled at the publication process by having a book description that's too long.

That done? Everything checked? You are now ready to start registering and publishing on Kindle. Hit THIS LINK to get there.

Conversion for uploading

You have your book, your cover, and your blurb

And now is the time to go back to the word document of your novel, and prepare it for publishing.

Make sure that you have no headers or footers, and no page numbers. Kindle cannot cope with any of those, because the reader is in charge of font size, which also means page size, and hence the number of pages in the book. This also means that it is pointless having a different font size for emphasis. Italics are fine, though. Avoid underlining -- it is too easily confused with the underlining in URLs.

There is a manual called "Building Your Book for Kindle" that you can download for free from the Amazon site. Contrary to the advice given in "Tips for Formatting," I have recommended single spacing throughout the main text of your novel. To repeat, do not insert an empty space between paragraphs: believe me, it makes pages of dialogue look awful.

I have also recommended formatting with style sheets rather than fiddling with the "paragraph" tab in the main ribbon to create indents, because I found the style-sheet method works very well indeed, with a professional-looking result. And you don't need to insert page breaks between chapters, because the style sheet has done it for you.

The manual also describes the procedure for including images in your book. I haven't done this, because this series is about publishing your novel on Kindle, not your illustrated nonfiction book. Likewise, I haven't bothered with a table of contents, which is almost as complicated as inserting images, because of the back-buttons. And obviously there is no index.

If you want a dedication, insert a page after the copyright page, type the dedication, and center it. Treat a prologue (if you have one) just like a chapter, highlighting the word "prologue" or "foreword" and applying the stylesheet you used for your chapter headings.

Remember not to include your cover image or your blurb with your book file. They are separate files.

And, at this stage (sigh) you just might want to proof-read again. As the manual says, typos can make the differentce between two-star and four-star reviews.

All done? Happy? Now is the time to convert your word document to HTML.

&lt;&gt;&lt;&gt;&lt;&gt;

With your document open, go to "Save As" and bring up the menu. At this stage it is a good idea to save under another name, so that your original file isn't lost. Save in the desktop, and in the menu, select "Web Page, Filtered."


Hit "Save."

If a message comes up about removing office tags, hit "yes." I also got a message warning me that small caps would be saved as all caps. I hit "yes."

Now, close your document, and head for the internet. It is time to log onto the Kindle Direct Publishing machine. The address is http://kdp.amazon.com/


Over on the far right you will see a "sign in" gadget.


If you don't have an Amazon account, sign up: it's easy and quick.

Once you have signed in, you will be brought to "Bookshelf."


Directly under "Introducing KIndle Direct" you will see two boxes. The second, highlighted one, says "Add New Title." Hit it. This will bring up another screen -- the "Book Details" screen.


If you are going to publish ONLY on Kindle (and not on Kobo etc.) then click the box "Enroll this Book in KDP Select." Then head for the boxes, making sure you fill them all, as necessary.

Book details

Insert the book's title in the box under "Book Name." Then fill in the next box if the book is part of a series. Otherwise, leave it blank.

Book description

Go to the documents file on your computer, find the blurb you have so carefully written and saved, open it, hit "select all" to highlight all the text, and hit CTRL + x This will put all the text into your clipboard. Now go back to the Kindle publishing page, and put your cursor on the box that is headed "Book Description." Hit CTRL + v, and your blurb will be pasted into the box. Read it carefully, checking for typos, and putting a space between paragraphs. Italics will not be there, but (as far as I know) you can't do anything about it, so you just have to live with it.

The next box asks you for contributors. Unless you co-wrote the book with someone, you only need to put in your name, as the author. Leave the language as English (assuming your novel is in English!) and leave the other three boxes blank: Amazon will add the current publication date, and assign your book an ASIN.

Verify your publishing rights by checking, "This is not a public domain work and I hold the necessary publishing rights."

Now, you are asked to target your book for the market.

Hit "Add Categories." A long list of genres will come up; clicking on the + sign by each one will bring up even more. The ones you opt for will help Amazon match your book to customers. Unfortunately you are only allowed to choose two. But you are allowed to type up to seven keywords in the box below it.

Upload your book cover

This is really easy. Click on the box that says "Browse for image," find your saved jacket image in your pictures folder, and upload it. You will see it as a thumbnail. If you suddenly hate it and want to change it, go to the bottom, hit "save as draft," leave the publishing page in the meantime, and go back to work on your powerpoint image. Then when you sign in again to KDP, you will be able to replace the hated image with the new one. But hopefully, it will look just fine.

Now for the tricky bit: uploading your book file, and checking it will look good on the device.
That will come in the next post, because it will be quite long -- longer than this blogsite can handle. In the meantime, go to the bottom and "save as draft."

YOU'RE ALMOST THERE! Hit THIS LINK to see the next step.

Uploading, checking, publishing


Downloading and checking your novel

Go back to http://kdp.amazon.com/

And sign in on the screen that comes up. You will be back at "bookshelf" and your unfinished publication process.

Click the box next to the name of your novel. Then hit the arrow by the box that says "Actions"
In the menu that comes up select the top option, "Edit Book Details" and lo, you are back where you were before. Scan down, checking that you got everything right, and then you will be at the "Upload Your Book File" screen.


Click the box by "Enable Rights Management." This means that no one will be able to pirate your work.

Then hit "Browse for Book." This leads you into your computer. Because you have saved the HTML file of your novel on your desktop, it should be easy to find. Click "Open" or hit enter, and then click on "Upload Your Book." You will have to wait a minute or two, as Kindle will be busy converting your file, but then the message "Upload and Conversion Successful" will appear.

You haven't finished, though -- you have to check it before you are ready to publish.

Go to Preview Your Book


Don't use the Simple Previewer -- it doesn't give you a good idea at all. Go the Enhanced Previewer and hit Download Book Preview File. This will put the .mobi version of your novel into your download file. When this is done, go to Download Previewer, and click on either Windows or Mac, according to what suits your computer.

Then, in the ribbon that pops up at the bottom of your screen, click "Run." Then click "View downloads." Not only can you watch its progress, but you can check at the same time that your novel has been downloaded in "mobi" format by the Kindle machine.


At the end, a box will come up confirming that you want the previewer's language to be English: check this, and then check the box for rights and agreement that comes up next.

Now, it is all set up for reviewing your book as it will appear on all current Kindle devices, plus iPad and iPhone.

Go back to your computer. There should be a shortcut icon on your desktop called "Kindle Previewer" you can click next. If not, search your computer by going to Start and viewing "All Programs." The previewer may be called "Kindle Previewer," as it is on my computer, or you may find it under "Amazon."

Whatever the method, clicking will find a screen like this:


Double-click on the highlighted name, and you will get the previewing tool:


Click on "Open Book to preview."

This should take you to your list of downloads, where you will find your book in .mobi format. Click on the name, and start previewing your book.

It will appear in an abbreviated screen:


By clicking on the icons in the top ribbon, you can use the previewer much as you would use a proper Kindle -- you can go back and forth, view the cover, if there (don't worry if it is not there, as Kindle will add it automatically when you publish), and change the font. It is important to hit the word Devices above the icon ribbon, to run your view through the various forms of Kindle and tablet.

Check that your title, the copyright claim, and the dedication (if you have one) are all on separate pages. The book itself should start on a new page.

Now, proof the book

Keep lots of paper and a pen or pencil beside you as you read through the whole book. Don't miss a single page, and make sure that you check both top and bottom of each page. The conversion process may have deleted spaces between words, so look for that: and make sure, too, that the space between one sentence and the next is still there, particularly if quotation marks are involved.

Some characters may have been corrupted, though this is uncommon. Inevitably, you will see typos that you missed in all your previous searches. Write all these down on your paper, numbering your pages and including enough of each sentence for you to find the places easily when you correct them later.

When you have finished, close the previewer.

Go to the HTML file of your novel that you saved on your desktop before you started the publishing process. Right click, and find the command "open with." Choose Microsoft word.

Your document will look spread out when you see it, and in this form it is very hard to correct. Go up to "view" in your top ribbon, and choose "print layout." If the text is still very small, go into zoom (still in the "view" screen) and adjust to suit your eyesight. Now, make all your corrections.

Once done, you go through the old process of saving to your desktop in "web page, filtered" mode, but change the title by putting "v2" in front of the name of the book so it reads, "v2YourBook." This is to help you tell it apart from your original, uncorrected version.

Go back to your KDP page at kdp.amazon.com Sign in again, if necessary, and check the box next to your book's title. Then click the box marked "Actions" and this menu will come up:

At this stage it is a good idea to explore the possibilities of enrolling your book in KDP Select. While it means that you cannot publish your novel in any other platform than Kindle, it has all kinds of promotional possibilities. Accordingly, at this stage I enrolled my book in the scheme. Whether you want to do this or not is up to you.

To carry on with the publishing process, click "edit book details"

This will bring up your bookshelf. Run through the items you have filled in until you get to the command "Browse for book" Find your v2 title, and upload your book, just as you did before. Kindle will automatically overwrite the earlier, faulty version, so don't worry about that: just wait for the Upload and Conversion Successful message. Then go to "Download Book Preview File."

When that is done, it is time to recheck. You don't need to reload your Kindle previewer. Just go to your desktop, hit the icon (if there), double-click on the KindlePreviewer name, and then "Open Book." Look for the v2 version in your downloads screen, and bring it up into the viewer. Check again for typos, missed spaces, and generally make sure that all your corrections have been made. If they haven't, go through the word document yet again, calling the new version v3, and repeat the upload process.
Finally, when you are happy with the way your novel looks, hit "Save and Continue." That will take you to the Rights and Pricing Screen.


First, Verify Your Territories. It is easiest, of course, to give Amazon full rights, and click "Worldwide rights, all territories." You may, however, wish to select individual territories, reserving some for other eBook platforms.

Then, Choose Your Royalty. If your book is priced between $2.99 -- a very popular price for Indie eBooks, and one that seems to help sales -- and $9.99, you will get a 70% royalty, less a small transmission cost for each sale. The other option is to ask for a 35% royalty, which means that you can charge a higher price.

Your choice is up to you. This exercise cost me nothing, and was undertaken out of sheer curiosity, so I opted for a price of $2.99, which gives me a very attractive 70% royalty -- about two dollars per sale. Then I checked all the boxes by the other Amazon outlets, automatically converting $2.99 US into the other currencies.

Moving down, you will see a box by "Kindle Book Lending." If you have opted for Kindle Select, this will be faded out, because Kindle Select books are automatically registered in this scheme. This is like the Public Lending Rights scheme that already exists in countries like New Zealand and the USA, where authors are compensated for the loss of royalties when books are borrowed from libraries. Amazon puts aside a significant sum of money each month ($600,000 at the moment) and this is shared out on a unit basis with participating authors.

Now, check the box that says you have every right to publish your book. Then hit Save and Publish.

AND YOUR BOOK IS PUBLISHED!

Hearty congratulations.

The book might take a few minutes, a few hours, or a couple of days to materialize on the Amazon site, but the process is underway.

The tutorial isn't finished, though. You want to receive those royalties, right? So you have to tell Kindle how to send them to you. And there is the little problem of tax ... And then the important matter of letting the world know that your book is there.

I'll tackle all that in the next post. Hit THIS LINK to get there.


Royalties and taxes

Money, money, money

If your novel still hasn't appeared a day after you trimphantly hit "Save and Publish," the chances are that you are new to Amazon, and were not asked for your address and account details when you signed up for Kindle Direct Publishing.

To remedy that ... and make sure that your royalties get to you ... go back to your Kindle Publishing page. Up at the top right in the ribbon menu, you will see a label for your account. (Mine says "Joan's Account.") Hit this, and a screen that you have to fill in arrives.


Put your name in the first box -- your real name, not your penname, if you used one. Then scroll down the "country" menu until you come to where you live, and click that. In Address line one, put your house number and your street, and your suburb in line two. (Don't use a post office box number, and don't abbreviate.) Then your city and your zip code. And after that, insert your phone number, with country and area code.

At this stage, US residents can fill in their tax information. (Foreign residents have a more daunting task ahead.)

Then go down to Your Royalty Payments. This is where you register your bank account details if you have a US bank account. Royalties from other Amazon marketplaces will be converted into US dollars and deposited at the same time.

If you don't have a US bank acount, leave this part blank, and you will be paid by check. It is a slower process than an electronic deposit, but you will eventually get your money.

Hit Save.

Taxes, taxes, taxes ....

It's a tricky business for foreign writers.

Amazon/Kindle automatically withholds 30% of your royalties for tax purposes unless you have a tax number, and your country has a tax treaty with the United States. For details of this complicated situation, go to this very helpful page

You can find out if your country does have a tax arrangement with the IRS by going to page 36 of this IRS document (In the page-number box at the top, replace the number 1 with 36, and hit enter.) Don't worry about the letters and numbers; the important part is whether your country is there or not. If not, you will have to pay the 30% tax, and live with it.

If your country is listed as having a tax treaty with the United States, get going right now on getting a tax number, as it takes ages ... and your home country tax number isn't any kind of substitute. The IRS simply does not recognize foreign tax numbers.

There are three kinds of tax numbers they do recognize: a TIN (temporary tax number), an EIN (empoyer identification number), or an ITIN (individual taxpayer identification number). As you are an individual author, and not an employer or a business, the one that you need is an ITIN.

To apply for one of these, you have to fill in a Form W-7. Download and print this.

The instructions for filling it out can be found HERE

Then you have to prove that you are who you are . . .

The Quest for an Apostille


I didn't have this problem, because a university in Indiana obtained an ITIN on my behalf many years ago, but New Zealand Indie author Desiree Jury was kind enough to share her quest with me. While what she has to tell us applies to New Zealand, the process should be very similar in whatever tax treaty country is yours.

Attached to your W-7 you will require duly authorized copies of identification documents such as passport and driver’s licence. In most cases this requires you to obtain an Apostille. This is an internationally-recognised certificate under the Hague Convention, which “provides for the simplified certification of public (including notarized) documents to be used in countries that have joined the Convention.” (I quote from IRS instructions for form W-7).

To obtain an Apostille you need to take your passport, driver’s licence or similar to a Notary Public. I had to ask my lawyer, who found me a pleasant gentleman, who charged $50 for a splendid two-page certificate on cartridge paper, in English and French, with red seals and blue ribbon. Talleyrand would have loved it.

The completed Apostille must then be taken to the [New Zealand] Department of Internal Affairs to be duly authorized and entered on their website. This is done at the DIA Authenitication Unit, level 13, DIA 86-90 Lambton Quay, Wellington (another $32).

At this point you assemble your completed W-7 (ALL of it, not just the top page. Remember to fill in Exception #1, Third Party Withholding on Passive Income, on page 6; exception 1(d)). Attach your publisher’s form letter, your cover letter, and the apostille. Send it to the address given in the form. (Note: You can’t send this Express Courier unless it is addressed to a specific individual with a nominated phone number. You will have to settle for Economy Courier).

Sit back and wait. Once you receive your ITIN you can complete the W8-BEN.

The address where you send all this material -- including the required letter from Amazon, which can be downloaded HERE, is:

Internal Revenue Service
ITIN operation
PO Box 149342
Austin, TX 78714-9342, USA

Then, as Desiree says, you sit back and wait, for about two months. But finally, with luck, you will have your ITIN, and you will be able to fill in a form W-8BEN and send it to Amazon.

Download the W-8BEN

An example of how an individual author should fill it in

Once filled in and signed according to instructions, send it to:

Amazon Digital Services
Attn.: Vendor Maintenance
PO Box 80683
Seattle, WA 98108-0683, USA

And whew! ... that's it.